Doubles Facts in Math: Addition Fluency Strategy

Doubles Facts in Math

Increasing students' fact fluency is an important goal in first grade!  For a small group of students memorizing addition and subtraction facts comes easy.  But most kids need a considerable amount of time and practice in order to become fluent with addition and subtraction facts to ten.  Today, I want to share some ideas for helping students to practice doubles facts. Doubles are a great place to start for increasing fact fluency and is also a precursor to learning the "doubles +1" strategy.  

Dice Games

Kids love using dice! If you haven't already, start collecting a wide assortment of dice: big, small, dots, numbers, different colors, dice within a dice, 6-sided, and specialty dice. Changing the dice is an easy way to add novelty to your math activities.

Roll and Color Dice Game
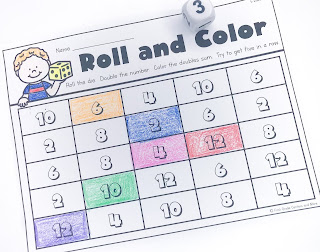
One simple math game for practicing doubles facts in math is Roll and Color. Students roll the dice and color the "double" of the number. They try to color five numbers in a row. Playing with a partner is a blast because they can block each other. Your class will want to play this game again and again!

Roll a Double Dice Game
Roll a Double is another simple activity for practicing doubles facts.  Students roll 2 dice or a dice within a dice (pictured) until they roll a double.  Then they record their double fact.  This game could even be played with just a piece of notebook paper for recording their doubles. This game is fast-paced and lots of fun!

Dice Tip- Foam dice that are quiet when they are rolled are amazing!  Another option is to have students roll the dice on a 9x12 felt square, which can easily be found at your local craft store.

Cubes

Build a Double
Unifix cubes are an excellent math tool that can be used in SO many ways!  They work great for practicing doubles facts in math. Give students a target sum (even number) and have them build a doubles cube model for that sum with two colors of cubes.  Starting with the sum is a great way to encourage some problem-solving skills for your students.

Ten Frames

Ten frames are a powerful math tool for helping kids visualize numbers!  Use doubles facts flashcards to have students build addition problems on their ten frames. 

This mat is fabulous for whole or small groups. Put the mat in a write and wipe pocket or page protector for repeated practice.  Students use dry erase markers to record the fact, then erase and start again.  

Ten Frames Doubles
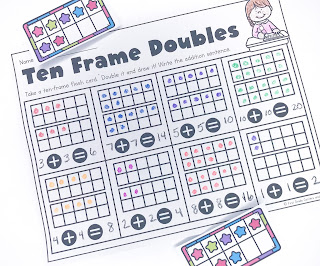
This worksheet is great for independent practice or a math center. Kids choose a ten frame. They double the number and write the addition sentence.  You can download a copy of the worksheet here.

Interactive Notebooks

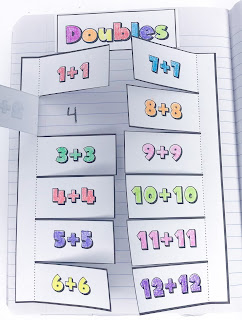
An interactive notebook activity provides an opportunity for students to review their work.  They will love to revisit their notebook and practice their doubles!
Interactive Notebook Doubles

Dominoes

Dominoes are another great tool for visualization! Have your students dig through sets of dominoes looking for doubles.  Then have them record the pairs of doubles facts.
 
Domino doubles

Games!

Kids love anything that feels like a game instead of work!  Here are a couple of game ideas for you.
Doubles Memory

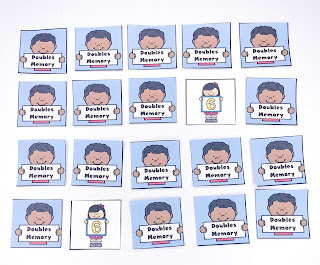
Memory Match:  Students find matching numerals. Then they tell the doubles fact. You could use something as simple as a deck of playing cards for this activity.

Addition Number Puzzles

Puzzles are another game option. The best part- they are self-checking!  Consider adding in a recording sheet for accountability
Doubles Addition Recording Sheet

Math Links:

First-graders love math links!  They are also a great way to continue to develop fine-motor skills.  Have students build doubles addition facts with the links.  Then they can attach the problem and the sum.

Doubles Addition with Links

I hope this gave you some ideas of activities you can do in your classroom to help students learn their doubles facts in math and build their addition fluency.  If you would like to learn more about this resource, you can click the picture below.

Doubles Addition Unit


Classroom Management: Fast Finishers


classroom management
We've all been there.  Despite our best efforts at differentiation, some of our students complete their work very quickly!  Now they are standing by our side and asking "What can I do next?"

As you begin thinking about back to school, establishing a classroom management solution for your early finishers is one of the most important classroom routines you can plan for!

A reference display on a bulletin board or wall space makes an easy to manage system for our early finishers.  

I have used a couple different designs over the years, but the goal is the same: 
Create student independence through choice and a visual reference.

fast finishers        fast finisher
A few possible choices!

How it works: 
1.  Choose a variety of activities that students may complete when they are finished with their work.  Having about 6-8 student choices works really well.

2.  Create some sort of display for students to see a visual for the activities.  You could use a bulletin board, wall or door space, a pocket chart- the possibilities are endless.  If you don't want to create your own images, I have two versions available in my TPT shop.  Both sets have more than 35 options of activities!  They are quick and easy to print and hang.

classroom management          classroom organization
3. Rotate activities throughout the year so students have new choices to keep it fresh and fun!  One idea is to use clips or clothespins so you can quickly update the display.

Hear what others have said about my fast finishers bulletin board sets:

"This product has made my year in Kindergarten run very smoothly. The kids know exactly what to do when they finish and I have noticed a great change in behaviors!" - Amanda H.

"I always had kids come up to me and say, "I'm done, now what can I do?" Now with these fast finisher posters, I haven't had anyone ask me! The pictures are a great visual for students and now they always have something to do when they finish!" - Julia K.

What are some of your favorite activities for your fast finishers?  Leave me a comment with some of the choices your students have.


4 Ideas for Using the Microphone Tool in Seesaw


Are you looking for some quick and easy ideas you can use right away in Seesaw?

I LOVE the versatility that the teaching platform Seesaw offers for our youngest learners! There are great learning opportunities with the platform for both in-person and remote learning.

Today, I wanted to share a few quick and easy ideas to use the microphone tool in Seesaw.


Idea #1: Phonemic Awareness
Utilize the microphone tool to teach and assess students' phonemic awareness skills.  This is a great way to continue phonemic awareness instruction during remote learning!

  • Insert 6 pictures on to a Seesaw page and ask kids to record themselves telling 3 words that rhyme with each picture.
  • Practice segmenting skills. Add 6-10 pictures on a Seesaw page and ask kids to segment each word.  You could even create sound boxes and movable circles with the shape tools.
  • This same type of activity could be created for any phonemic awareness skill; substitution, deletion, etc.

Idea #2: Repeated Readings
The microphone tool is a genius way to work on fluency skills with repeated readings!!!
There are SO many possibilities for repeated readings:

  • Letter Names and Sounds
  • Sight Word Lists
  • Phonics Word Lists
  • Nonsense Words
  • Sight Word Phrases
  • Poems
  • Passages from your curriculum
  • Guided Reading books
Simply upload (or take a photo or screenshot) of the material for the repeated reading.  I recommend having them practice at least 3 times before they record!  Using the shape tools you can add 3 small boxes for students to check off each time they practice.  Need data to support fluency skills and progress- now you have some at your fingertips!

Idea #3: Reading aloud their Work
We all know it can be challenging to read the writing of primary kiddos!  Seesaw can make it even more challenging because of the size of assignments...hello...grading on your phone!?!  One simple solution is to have your students use the microphone tool to record themselves reading their work before they turn it in.  This way we know EXACTLY what they wrote, no guess work.  Not only that, but it allows students to practice their speaking skills.

Idea #4: Elaborating on Ideas and Deeper Thinking
Primary learners can be incredibly deep thinkers!  Sometimes it is hard to show that level of understanding in their writing.  So the microphone tool is the perfect opportunity for students to elaborate on their thinking, and really show what they have learned.  This strategy lends itself especially well to cross-curricular opportunities.  Some simple ideas:
  • Science or Social Studies: Post a video link to a topic you are studying.  After watching the video have students use the microphone tool to tell 3 new things they learned.  You could also have them create a picture of their learning with the drawing tools.
  • Math: Use the microphone tool for students to explain how they solved a word problem, or other math skill.
How do you use the microphone in Seesaw?  I'd love to hear even more ideas in the comments!

Looking for more Seesaw ideas and resources?  Need activities that are ready to use? I have lots of preloaded and ready to use activities in my TPT store.  
   

Commutative Property of Addition in First Grade

https://www.teacherspayteachers.com/Product/Commutative-Property-of-Addition-Hands-on-Activities-CCSS-1OAB3-4942042
You can help your first graders begin to develop the algebraic skill of the Commutative Property of Addition.  This understanding is an important building block and will serve them well as they continue to grow as mathematicians.  The Commutative Property of Addition states that no matter what order we add numbers, their sum will remain the same.  This concept is often referred to as "flip-flop" or "turn-around" facts for first graders and is the first step in understanding fact families.  I do think it is important that we begin introducing the proper math terminology to our first graders, but it is fun to use these terms as well, and they make sense to the kids.
Links are a fun way to begin teaching this concept!  Students can build a problem with two colors of links.  Then, they can "hook" the matching addition problem to the link.  Now, they flip the link over and can see the related "commutative" problem and add the matching card.  You could even have kids write and hole punch index cards for this activity.
Dice are always a hit with kids!  They especially love these dice within a dice.  Students can roll and record the two commutative facts for the dice.  Don't have these dice- no problem...regular dice work great as well, just use two.

Cubes are always great for hands-on math activities.  Students can build, color, and write the commutative facts.  They can really see how the problems are "turned-around", but not changed in any other way.

Ten frames work great for a variety of manipulatives; cubes, counters, erasers, just about anything you can think of.  Dot markers and colored stickers also work great on ten-frames!  Students can "spin" the ten-frame and see the commutative fact.
Similar to the dice activity, dominoes also work great!  They are easy to flip-around to see the new fact.  You can also have the kids draw the dominoes they used.  

Don't forget about center time!  All of the above activities can be placed in centers for continued practice. Clip-cards, puzzles, and memory also make great centers!
  
You can find these activities (and more!) in my Commutative Property of Addition: Hands on Activities on TPT.


Guided Math Mats for Kindergarten

small group instruction, differentiate

I love math mats!  They are quick and easy to prepare (most are print and go!), easy to differentiate, and can be used again and again!  Quickly change out the manipulative you are using and the activities feel new and fresh again!  

I recommend using reusable write and wipe pockets.  They are sturdy, easy to clean, and FUN for kids!  If you don't have access to the pockets then you could use page protectors or laminate the mats. 


Here are a few of the mats:
One of the additions I tried to make to the Kindergarten mats is to have a fine motor component.  Here students can use tongs to put the poof balls and bears onto the mats.  
Once students have practiced with the mats during Guided Math groups, many of them can easily be moved to an independent center for additional practice.
Each mat comes with a teacher sheet that lists math standards, materials, directions, and options for changing it up!
Make it fun by changing out to a different manipulative!  I love all of the seasonal erasers!
Many of the mats come in multiple levels, so it is easy to differentiate!
Dice, magnetic numbers, and playing cards are an easy way to mix it up!
Subtraction smash is always fun!  Build the first number with playdough balls, then smash the number being taken away!
Don't have geoboards?  Kids can draw the pictures!  Great for visual perception and geometry vocabulary!


Want to learn more about the mats?  Click here.

Translate

Back to Top